As a researcher, you know that at a fundamental level, your experiments are geared to ask new questions and pursue new knowledge, while building on current knowledge and ideas. How does this dynamic play out during experimental design, when you are comparing reagents and antibodies to use? Gathering as much published information about your target molecule as possible before you get started will help to ensure the success of your immunoassay. In the final Antibody Essentials blog, we will integrate all of the learnings from the first 4 parts of the series, so that you will know what questions you should be asking as you design your experiments, select targets, and choose antibodies.
Table of Contents
Understand Your Target
In hypothesis-driven research, you’ll begin with an idea about particular biological activity, function, or mechanism in your experimental model. This hypothesis might emerge from the results of a previous experiment in your lab, from reading the literature, and/or from discussions with collaborators. Refinement of your hypothesis and experimental design, which includes target and antibody selection, often will go hand-in-hand. Nevertheless, the better you understand the biology of your target protein before you begin your antibody search, the more informed your antibody selection can be.
Target characteristics that should be considered include the expression level and subcellular localization of the target protein, as well as its structure, stability, and homology to related proteins. It’s also important to consider whether your protein undergoes any post-translational modifications or if it’s the target of upstream signaling events, since this will provide valuable insights into its overall biological context and may provide additional considerations for experimental design and antibody selection. Consulting open-access resources such as Uniprot or the Human Protein Atlas, and reading the literature to learn as much as you can about your target protein, is a good idea. Resources on signal transduction, such as the CST Pathway collection or Phosphosite Plus can provide important context for the biology of your target protein. All of this information can also be useful for choosing controls, designing other components of the experiment such as what activators or inhibitors to use to perturb signaling activities, or for identifying the next target for a follow-up experiment. Finally, colleagues in your lab, down the hall, or in your network can be a source of information as well; you can also check antibody review sites, where researchers can provide feedback regarding antibody performance and share advice for optimizing different immunoassay protocols.
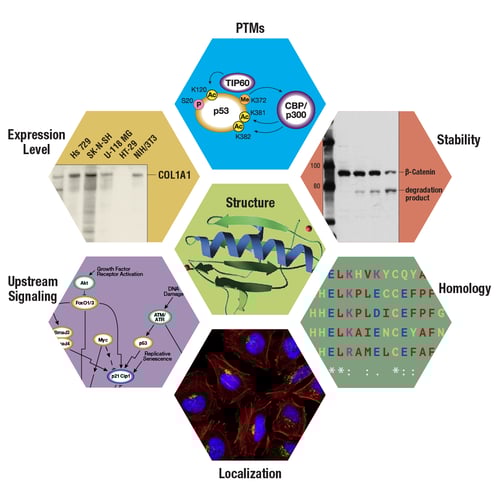
Figure 1. Experimental design and protocol optimization choices may be influenced by the characteristics of the target protein. Depending on the target, model system, application, and experimental aim, some of the target characteristics shown here may merit more consideration than others.
Using Search Engines to Find Antibodies
After compiling a list of targets for your experiments, you’ll probably go to Google or another search engine, using your target of interest and desired application (type of immunoassay) as search terms. As an example, suppose that you are studying a process that activates necroptosis (a form of cell death), your model system is a cultured mouse cell line, and your preferred application is immunofluorescence-based microscopy. During necroptosis, the RIP1 and RIP3 kinases form a complex and phosphorylate each other, leading to the phosphorylation and activation of MLKL, which acts as the effector in necroptosis.
Your experimental design, then, might include primary antibodies for these three proteins, so you would search for “RIP1 antibody, “RIP3 antibody”, or “MLKL antibody”. You might also include one or more modifying terms like “mouse,” “monoclonal,” or “phospho.” The results of each antibody search will include results for product pages from various manufacturers' respective websites. Sometimes, search engines will return antibodies that meet some, but not all, of your requirements, so you will want to take a closer look at each product page to see if any include immunofluorescence data, and exactly what validation experiments were performed. Based on this information, you’ll start to narrow down your list. You can also consider using the “filtering” function in the antibody search page on cellsignal.com or on a reagent-focused search site such as Citeab or Biocompare to narrow your search. But either way, your next step is to collect more information.
Species Reactivity
Examine each antibody’s product page for information that supports the target species reactivity. Recall the distinction between target species reactivity and antibody host species, keeping in mind that the phrase “RIP3 mouse antibody” might return mixed search results including mouse host antibodies that don’t necessarily react with the mouse RIP3 protein target. Check the listed species reactivity and look for validation data performed with cells or tissues from the desired species to support the antibody’s species reactivity.
Application
Your initial search results may include a number of antibodies with the desired target reactivity and species reactivity, some of which have been validated in your desired application, but others have not. Even if you include “immunofluorescence” or the name of another application as a search modifier, it’s a good idea to once again look at the data on each antibody’s product page to check specifically for validation performed in your desired application. In addition to checking the application matches, look for details about the experimental design and protocol used for the validation experiments. What cells or tissues were used in the experiment, and did they need to be stimulated with a ligand and/or treated with an inhibitor to generate the desired result? Were appropriate controls included in the experiment? How were the samples prepared and processed during the protocol? The answers to these questions can help you decide whether antibody is likely to work with your samples and protocol, or if you will need to consider adding your own validation tests before scaling up your experiments.
Regardless of the application being used, no single assay is sufficient to determine the validity of an antibody. Confirming that an antibody is both specific and sensitive depends on the application and protocol being used, the type and quality of sample being analyzed, and the inherent biophysical properties of the antibody itself. The performance of an antibody in your hands in one application, such as immunofluorescence with a cell culture model – even when including knockout of the target molecule--doesn’t necessarily have any bearing on its specificity or performance with another application and another protocol, such as immunohistochemistry on paraffin-embedded tissue samples. This is due to differences in sample preparation that could affect epitope structure or availability, or due to differences in antibody binding conditions that can affect the strength of the antibody-antigen interaction. You can learn more about how CST validates antibodies in our Hallmarks of Validation video below. It provides an overview of the different strategies we use, which you can adapt for your own validation experiments.
Antibody Host Species, Isotype, and Subclass Considerations
Why should you note the host species and isotype of the target antibody? Protocols for many immunoassays include an incubation step for the primary antibody, which binds to your target, followed by an incubation step with a conjugated secondary antibody in order to produce a signal at the end of the immunoassay. This approach is used for chemiluminescent detection in western blot, or for fluorescence-based amplification and detection in immunocytochemistry, flow cytometry, and other assays. This requires a secondary antibody that recognizes the primary antibody, which is where the host species and isotype of the primary antibody become important. Some secondaries will recognize multiple isotypes of one species (such as mouse), others will be narrower and recognize only one isotype (such as mouse IgG) or even more narrowly recognize only one subclass (such as mouse IgG2a). Matching primary and secondary antibodies also can enable the design of multiplexed experiments that use pairs of primary and secondary antibodies with different isotype and fluorphore combinations. Alternatively, directly conjugated primary antibodies can be considered; if you go this route, you would ideally want to see validation data generated using the specific antibody conjugate you will be using.
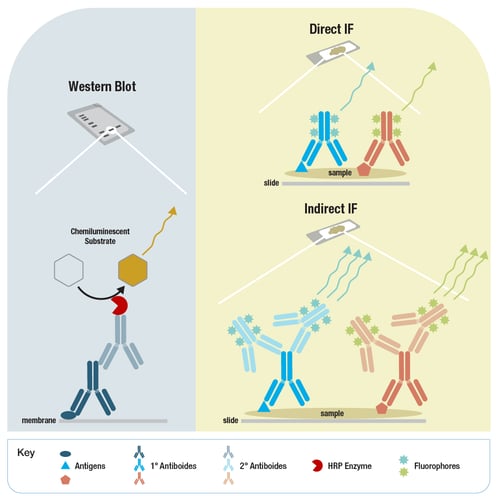 Figure 2. Secondary antibodies are conjugated to an enzyme such as HRP for use in chemiluminescent detection for western blot (left), or to fluorophores with distinct emission wavelengths for use in indirect immunofluorescence (lower right).
The antibody host species is also an important consideration in relation to the species that the sample material came from. In immunohistochemistry, mouse-on-mouse cross-reactivity may arise when anti-mouse secondary antibodies bind to endogenous mouse immunoglobulins in the tissue sample, resulting in unwanted background signal. This can limit the utility of mouse-derived antibodies when working with certain mouse tissue samples. Similar background staining can also occur if secondary antibodies bind nonspecifically in the sample, making it vital that you choose well-validated secondaries and include relevant controls to avoid generating misleading results.
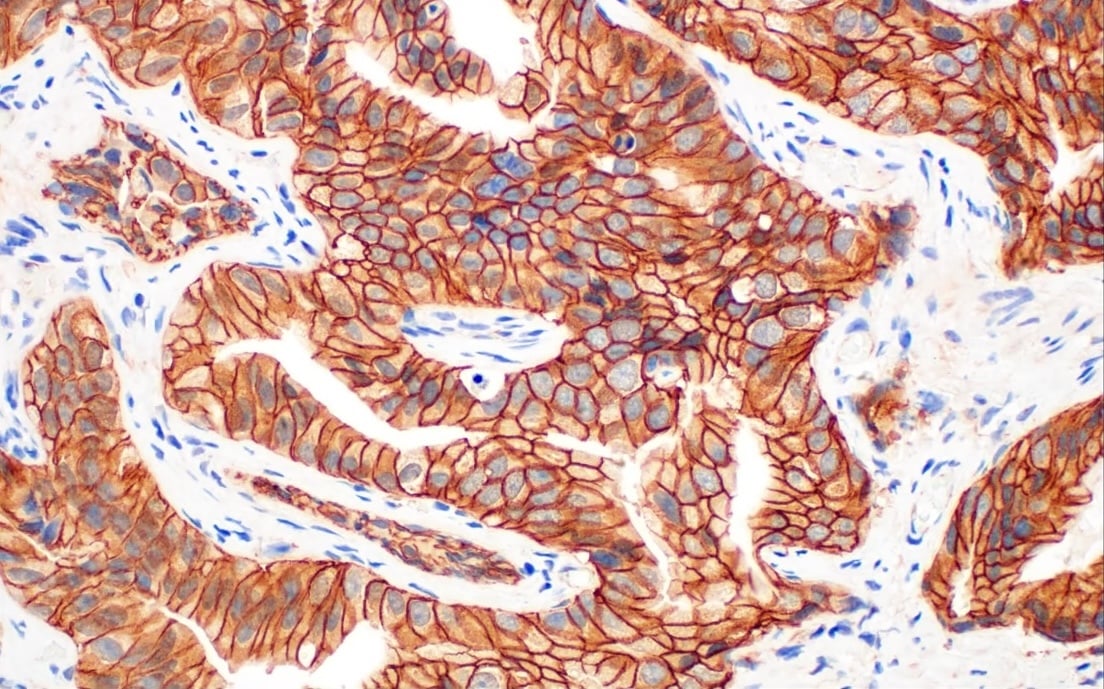
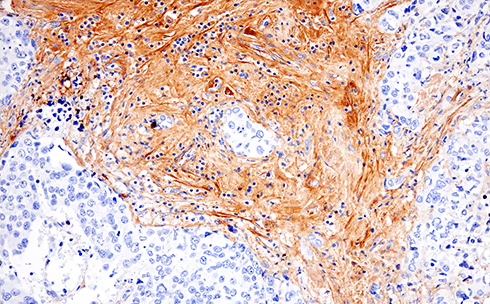
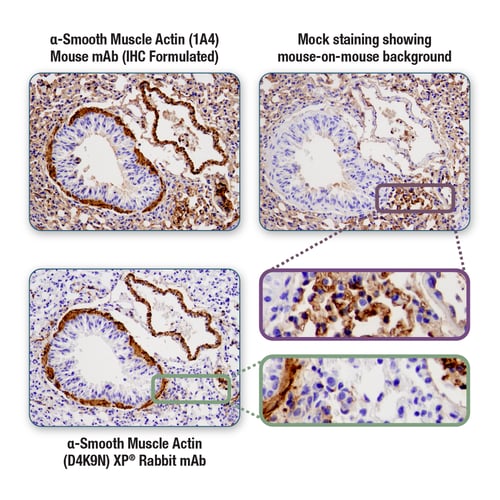 Figure 3. Immunohistochemical analysis of mouse lung tissue, performed with a mouse host antibody to α-Smooth Muscle Actin and anti-mouse secondary detection reagent (upper left), or mock stained with anti-mouse secondary detection reagent alone (upper right). The latter indicates the presence of mouse-on-mouse background staining. By switching to a rabbit host antibody for the same target and anti-rabbit secondary detection reagent (lower left), mouse-on-mouse background is removed.
Antibody Clonality Considerations
We discussed the advantages and disadvantages of monoclonal vs. polyclonal antibodies in the previous Antibody Essentials blog. For now, we'll just reiterate that when available, it’s recommended that you choose a recombinant monoclonal antibody for your research to benefit from the consistent performance. However, if you’re detecting a novel target, a polyclonal may be your only option until a monoclonal has been developed. If this turns out to be the case, you may decide to perform your initial studies with a polyclonal antibody, subsequently deciding between a mouse monoclonal or a rabbit monoclonal when these become available. Both mouse and rabbit monoclonals provide many advantages compared to polyclonals, meaning that choosing between them will largely be dictated by the unique requirements of your immunoassay.
Antibody Production Considerations
While most commercially available antibodies are supplied as a purified preparation in an aqueous buffer, you might encounter less purified preparations such as a crude serum isolated from blood. Alternatively, if hybridomas are used for monoclonal production, the antibodies may be collected from cell culture media or from ascitic fluid collected from mice that have been injected with hybridomas. These can be problematic if you plan to conjugate the antibody to an enzyme or a fluorescent dye, or if you wish to perform an experiment such as an immunoprecipitation, since the antibody concentration is typically low. These crude preps can also contain other proteins or components that could interfere with antibody conjugation or have other unintended consequences on your assay, meaning you would need to consider if additional purification is necessary. While it’s possible to perform a buffer exchange and concentrate the antibody in your own lab, this is often time-consuming and can be highly prone to variability. If you work in a lab or core facility that uses specialized or high-throughput immunoassay formats, you may consider carrier-free or custom formulations or bulk quantity purchases to suit your needs. For the majority of bench scientists, purchasing standard formulation purified antibodies provides enough options to probe the targets they're interested in using common applications and fairly standard protocols.
Antibody Specificity & Sensitivity
In the first Antibody Essentials blog, we defined antibody specificity and sensitivity. These are both of paramount importance when you’re choosing an antibody to support your research. First, let’s consider specificity; if you’re planning to detect a single member of a closely related family of proteins, you’ll want to make sure that the antibody you’ve chosen recognizes only the protein you’re interested in, without cross-reacting with other family members. Although a sequence alignment can give an indication of homology, the only way to be certain that an antibody is specific is to see testing data proving that to be the case. A trusted antibody manufacturer will have generated these data during antibody validation, eliminating the need for you to perform cross-reactivity testing yourself. They may have determined whether the antibody can recognize the equivalent protein target in other species. While cross-species reactivity can be useful in certain situations, for instance, if you’re comparing the response to a drug in both human and mouse cell lines, in many other cases it should be avoided. For example, if you’re planning to use the antibody to monitor the expression levels of an engineered protein in a cell line, you might significantly overestimate protein expression if the antibody also detects the endogenous protein expressed by the host cell.
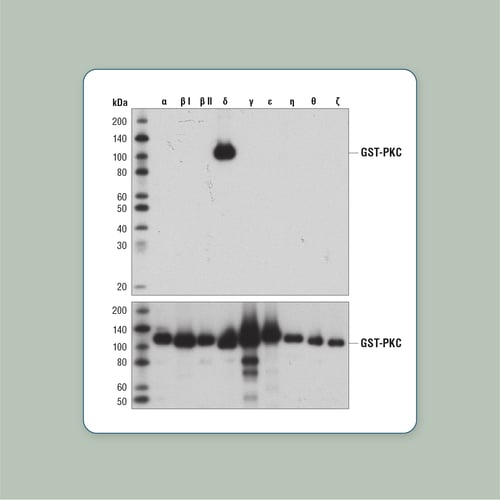
Figure 4. Isoform-specific detection of PKCδ. Bacterially expressed, GST-tagged, purified PKC isoforms were loaded into the lanes indicated for SDS-PAGE and western blot analysis using a PKCδ antibody (upper) or GST antibody (lower).
Finally, you’re going to want to consider antibody sensitivity, which brings us full circle back to understanding your antigenic target. If your protein is of low abundance, you’ll probably want to compare several different antibodies to see which produces the strongest signal in your immunoassay while retaining specificity. If using a phospo-specific antibody, you’ll want to see confirmation that the antibody is in fact specific for your target when phosphorylated at a particular residue, and that it is sensitive enough for your application. Then, consider what cell types are known to express the phosphorylated protein, and whether a stimulus will be required to detect it. If you’re planning to use a directly conjugated primary antibody in an immunoassay which has a fluorescent readout, you’re going to want to find out if your chosen antibody is available conjugated to a bright fluorophore that your instrument can detect, and consider the abundance of your target as well.
Consulting with Your Peers
Searching the published literature and digging into the materials and methods sections and supplemental figures of research papers may yield more information on antibodies that you are considering. Seeing that a particular antibody performed in your desired application, with similar sample materials such as cell line or tissue, can help instill confidence that you are making the right choice. However, it is important to remember that inaccurate or incomplete information in the literature has been a contributing factor in the reproducibility crisis, so always maintain a critical eye. Of course, colleagues in your lab, down the hall, or in your network can be a source of information as well. They may have done their own hands-on comparison of different antibodies or may have optimized an antibody for the same experimental model you plan on using. You can also check antibody review sites and even social networks, where researchers sometimes provide feedback regarding antibody performance. Again, the details matter, and a healthy dose of skepticism is a good idea until you can be confident the antibody is validated and working in your hands.
We hope we’ve provided you with some useful information to help choose antibodies to support your research, but if you take away only two messages from Antibody Essentials, it’s these:
-
No single assay is sufficient to determine the validity of an antibody.
-
Think critically about the antibodies you are planning to use, as if you were producing and validating them yourself.
Keeping these principles at the front of your mind will go a long way in avoiding setbacks in your research, and ensure you can get the best out of these critical and valuable research reagents.
Read the entire Antibody Essentials series:
- Antibody Essentials Part 1: Antibody Basics
- Antibody Essentials Part 2: Antibody Diversity and Classification
- Antibody Essentials Part 3: How Antibody Technologies Evolved
- Antibody Essentials Part 4: Polyclonal vs Monoclonal Antibodies
- Antibody Essentials Part 5: Important Considerations for Antibody Selection
20-FLE-62535